
What you need
- GX device with Venus OS Large — Cerbo GX, Cerbo-S GX, Ekrano GX, Venus GX, Octo GX, MultiPlus-II GX or EasySolar-II GX. Color Control GX and CanVU GX do not support Venus OS Large. Speed comparison: requirements on the section homepage.
- Internet on the GX — to download Venus OS Large from the update menu and to install additional nodes.
- Computer on the same network — the Node-RED editor opens in a browser.
Preparation: Cerbo GX, MultiPlus-II GX and EasySolar-II GX do not require any. On Venus GX you must first install and run version v2.73 or later, and only then Venus OS Large — this is about the flash memory partitioning required by Venus OS Large.
Installing Venus OS Large
- Update. Update the GX to the latest version: Settings → General → Firmware → Online updates (in earlier versions Settings → Firmware → Online updates).
- “Large” image type. In the same menu, set Image type to “Large”, go back one level, check for a new version and install it. Download time depends on the connection, then the GX restarts, and the installation itself usually takes about 2 minutes.
- Check. After the restart, Venus OS Large settings should be visible in the Settings menu, under integrations — that means the image installed correctly.
- Enable Node-RED. Enable Node-RED in the integration settings. Installer access level is needed to enable and disable Node-RED and Signal K.
Updates continue to work the same — online or offline. The Image type setting determines which image is updated.
First opening of the editor
- Address:
https://venus.local:1881. If it does not work, replace venus.local with the GX device IP address on the local network, for examplehttps://192.168.178.224:1881. How to find the IP address is described in the Remote Console on the LAN section in the GX device manual. - Browser warning — Node-RED on the GX uses an encrypted connection with a self-signed certificate, so the browser will report “your connection is not private”. Click “Advanced” or “Details” and continue. Benefit: the login and password do not travel across the network in plain text.
- Old http address and port 1880 — after switching to https, the address must start with https and the port is 1881. Trying to connect the old way ends with ERR_EMPTY_RESPONSE. Additional listening on port 1880 (for nodes that connect only over http) is enabled in the user settings file — see dashboard and best practices.
- Via VRM — the editor is also available remotely, in the Venus OS Large menu in the VRM portal. Depending on connection quality, it may be slow.
Editor password
| Venus OS version | What protects Node-RED |
|---|---|
| v3.50 and later | The security profile password (Settings → General → Security Profile) — the same one set for the “weak” or “secured” profile. Username: admin. |
| earlier than v3.50 | The Remote Console password, if set. Username: admin. |
Safe mode and restart
In the GX menu you can enable Node-RED in safe mode: Node-RED starts, but does not run flows. You can then open the editor and fix the flow before anything starts running — flows only start after you deploy the changes. This is an emergency option when a flow is causing heavy GX CPU load or other problems.
Restarting Node-RED is done by turning it off and on again in the Venus OS Large Features → Node-RED menu.
Flow backups
- Export: editor menu → Export → “all flows” saves the flows.json file on your computer. The manual recommends doing this regularly, and making an extra copy always before a GX software update.
- Restore: on a new installation — Import that same file. If a flow uses nodes that are not in the palette, the editor will report it; you need to install them first.
- What export does not include: the Node-RED configuration itself — that is in the .config.*.json files in the /data/home/nodered/.node-red/ directory.
- Full data partition backup and reset: the file
venus-data-00-backup-data-partition.tgzon the USB drive copies the entire /data partition to the USB drive, andvenus-data-20-node-red-reset.tgzdeletes the files from /data/home/nodered/ and lets you start Node-RED from scratch. Insert the USB drive into the GX and restart the device; completion is signalled by three beeps (on the MultiPlus-II GX, a message on the display).
Space on the data partition
Additional nodes are installed on the GX data partition, so they remain after a Venus OS update. At least 30 MB of free space must always remain on this partition. When free space drops below 5%, the GX shows warning #46 Data partition full; the exact value is shown in Settings → General → Modifications. If the partition is full, Node-RED may not start at all, and Venus OS stops working correctly.
The Victron node palette is part of Venus OS Large and updates only together with it. If a newer palette is already available online, but not yet in Venus OS Large, the instructions recommend waiting — a new Venus OS Large usually appears shortly after the palette update. What the palette includes: Victron nodes. First working flow: relay based on battery state.
Victron does not provide support for installations that use Node-RED for advanced solutions. Help: Victron Community, the “Modifications” area, Node-RED tag.
Devices this applies to
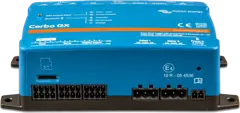 Cerbo GXSystem control centre and gateway to the VRM portal.
 Ekrano GXGX centre with built-in 7″ touchscreen.