
01What you need
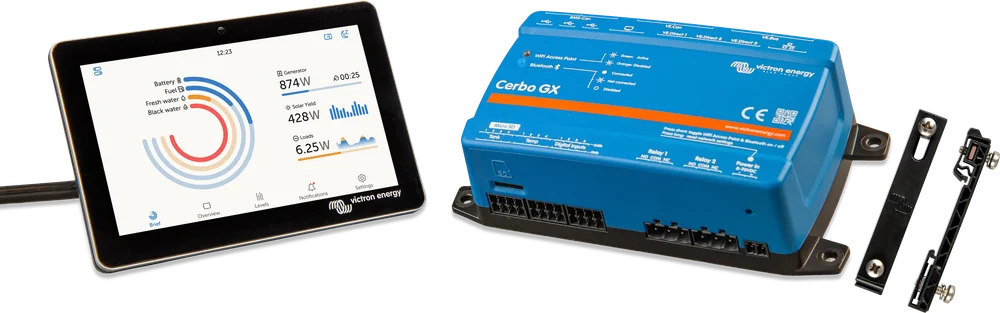
- GX device — for example Cerbo GX or Ekrano GX. It collects data from all connected devices (VE.Bus, VE.Direct, VE.Can) and sends it to VRM.
- Internet for the GX device — via Ethernet, Wi-Fi, GX LTE 4G modem or a mobile router. GX devices do not have a built-in 3G/4G modem or a SIM card slot.
- VRM account — registration at vrm.victronenergy.com is free. For your phone: the VRM app for iOS and Android.
- VRM Portal ID — a 12-character identifier made of letters and numbers (e.g. be300d83ff04). It is in Settings → VRM on the GX device, and on Cerbo GX also on a sticker on the side of the housing.
The VRM manual recommends, especially with SIM cards, that you first configure and test the connection in the workshop and only then fit the device on site. For this test, you do not need to connect any other devices — a GX device powered on its own will connect to VRM.
02Internet connection
| Method | When | What to watch out for |
|---|---|---|
| Ethernet | Whenever a router is within cable range — the most stable connection. | Do not confuse the Ethernet socket with the VE.Bus and VE.Can/BMS-Can sockets — they look similar. |
| Built-in Wi-Fi | Home, cabin, campervan on a campsite with its own network. | Only 2.4 GHz networks (5 GHz networks are visible but cannot be connected to), without WPS. Signal strength at least 50%. In a cabinet, an external USB dongle from Victron’s list will improve reception. |
| GX LTE 4G | Vehicles, boats and installations without permanent internet. | Provides internet only to the GX device — it does not share it with phones or laptops. In Europe, the GX LTE 4G-E model. |
| Mobile router | When several devices on board need internet, or a backup connection is needed. | Victron recommends a professional router, suitable for unattended operation — cheap consumer routers are unreliable. |
| USB tethering from a phone | As an emergency measure. | The connection chapter lists it as an option, but the chapter on data logging problems says to avoid tethering and phone hotspots because they are unreliable. |
When several connections are active at once, the GX device uses them in a fixed order: Ethernet first, then Wi-Fi, and LTE last. Only whether a link is available matters — the device does not check whether internet really works through it. Networks with a login screen or terms acceptance page (hotels, marinas, campsites, airports) will not work at all — the GX will then show error #150.
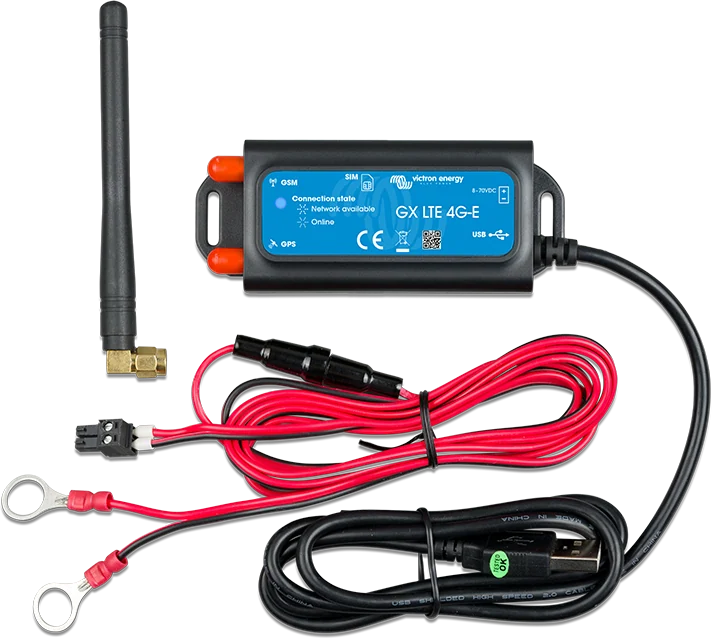
GX LTE 4G supports 2G, 3G and 4G networks, takes a standard Mini SIM card and operates from 8–70 V DC. It draws 2.5 W during transmission and less than 1 W at rest. Setup and problems with coverage, PIN or APN: “GX LTE 4G does not connect to the internet”. Wi-Fi problems: “Cerbo GX does not connect to Wi-Fi”.
03How data gets to VRM
- Devices to GXMultiPlus via VE.Bus, MPPT solar charge controller via VE.Direct or VE.Can, battery monitor or BMS.
- GX collects and buffersData are sent to VRM every 15 minutes (by default); without internet they stay in GX memory or on the microSD card.
- InternetEthernet first, then Wi-Fi 2.4 GHz, and GX LTE 4G last — in that order.
- VRMThe portal stores data, watches alarms and sends notifications.
- MonitoringA browser on a computer or the VRM app with push notifications.
04Adding an installation to VRM
- Connectivity first. You can add the installation only after VRM has received its first data from it. In Settings → VRM on the GX device, check “Last contact” — dashes (“--”) mean there has been no connection since power-up. The portal access mode must be Full (factory default) or Read-only.
- Account. At vrm.victronenergy.com: Login → Register for free, then confirm by e-mail. The manual recommends enabling two-step verification.
- Add installation. Select the GX device and enter the VRM Portal ID. On touch displays (GX Touch 50 and 70, Ekrano GX), Settings → VRM shows a QR code, and in Remote Console there is a button with a link — then you do not need to type the ID from the sticker.
- Installation settings. Name, location (also sets the time zone and is needed for the solar production forecast), photos and notes — for example an installation diagram to help support with remote assistance.
Whoever adds the installation first gets administrator rights. Other people who enter the same VRM Portal ID must wait for the owner’s approval. The “Installation could not be found” error usually means the GX device has not connected to VRM yet: “VRM does not show any data”.
05What you can see in VRM and for how long
- Dashboard — energy flow, battery state, solar production and consumption. In real-time mode the data refresh every 2 seconds, straight from the installation; this requires Venus OS v2.60 or later and a good internet connection. Real-time mode increases data use and GX processor load — only while someone is viewing the dashboard — and is enabled and disabled for the installation in Settings → General → Realtime updates (the “Getting started” section says it is off by default).
- Logging interval — outside real-time mode, data is written to the database at the interval set in the GX device, by default every 15 minutes.
- Storage — detailed data from the Advanced tab for at least 6 months (except battery state of charge), dashboard energy data (kWh) for at least 5 years.
- Without internet — the GX device stores logs in non-volatile memory for several days, and with a microSD card or USB flash drive much longer: about 25 MB per month when logged every minute, so a 1 GB card holds about three years. When the connection returns, the backlog is sent to VRM automatically. You can also handle an installation without internet manually: upload the file from the card in VRM with the “Upload GX file” button (up to 200 MB, VRM also accepts a gzip-compressed file), and locally convert it to an Excel spreadsheet in VictronConnect on Windows or macOS.
06Alarms and notifications
VRM monitors the installation in four categories:
| Type | What it does | Where it is useful |
|---|---|---|
| Communication monitoring | An alarm when VRM does not receive data for the set time. | Unattended fixed installations — a off-grid cabin in winter. |
| Automatic alarms | A ready-made list of parameters for all devices: including overload and low battery voltage in the inverter, low state of charge, and under- and overvoltage in the battery monitor, controller errors. By default only alarms are enabled; warnings can be added. | Every installation — works without configuration. |
| Geofence | An alarm when the vehicle or boat leaves the marked area, or when GPS data disappears. Requires a USB GPS receiver connected to the GX device. | Motorhome, van, yacht at berth. |
| Custom rules | Any parameter from the VRM database with thresholds, hysteresis and delay time. | For example state of charge while parked, tank level. |
Hysteresis prevents the alarm from repeatedly triggering and clearing near the threshold. Example from the manual: alarm when battery voltage drops below 10 V, and clear only after it rises above 11.5 V. Delay time filters out brief spikes — the manual gives the example of a tank sensor that briefly shows a low level when the pump is running.
Notifications arrive by e-mail, as push notifications in the VRM app, or as browser push notifications. E-mail is enabled once for all devices, push notifications separately on each device; in both cases there is a button to send a test notification. When the installation hovers around the threshold and alarms repeat, VRM suspends sending them (rate limiting) and resumes automatically after 24 hours.
Grid failure alarm in an installation with shore power: in the GX device, go to Settings → System setup, set the AC input type to “Grid” and enable “Monitor for grid failure”.
07Remote console, control and updates
The scope of remote functions depends on the access mode in the GX device (Settings → VRM → VRM Portal):
| Mode | Data in VRM | Real-time | Dashboard control | Remote Console | Remote updates |
|---|---|---|---|---|---|
| Full (default) | yes | yes | yes | yes (when enabled in GX) | yes |
| Read-only | yes | yes | no | view only | no |
| Off | no | no | no | no | no |
- Remote Console shows the same screen as the GX device on site — settings and overview, as if you were standing next to it. It works only when VRM data logging is active.
- Remote updates include MPPT controllers, BMV, SmartShunt and Phoenix inverters via VE.Direct, controllers via VE.Can, Inverter RS, Multi RS and Lynx Smart BMS, as well as the GX device itself (from Venus OS v2.80, preferably v2.90). The file is first sent to the GX device, so an internet outage during the process does not break the update. Victron says it plainly: a stable system does not need updating — newer is not always better.
- Remote VEConfigure lets you download and upload a settings file for a MultiPlus or Quattro connected to the GX device.
- Control — from the dashboard you can switch, among other things, the inverter/charger, GX relay, generator and ESS mode. The manual warns that enabling inverter control can very easily cut off AC power, and recommends leaving it disabled if you do not need it often.
08Users, fleet and sharing
- Roles — User (view only, for an inexperienced owner), Technician (diagnostics, updates, control, without deleting installations or managing users) and Admin (full access). An installation always has at least one administrator.
- Fleet — teams, installation groups and tags help manage multiple systems. A fleet dashboard with alarms and battery comparison appears automatically when at least 10 installations are assigned to the account.
- Sharing — a read-only link (optionally with a password and approximate location) or an embed frame for your own website. Shared views do not show real-time data. If access needs to be revoked for specific people, it is better to add them as users.
09When internet access is expensive
With a satellite link or mobile roaming, the GX manual gives four ways to reduce data use:
- turn off automatic firmware updates,
- set VRM access to Read-only,
- disable remote support (Settings → General → Access & Security → Remote support),
- increase the VRM logging interval (Settings → VRM → Log interval) — status changes and alarms still trigger extra transmissions.
Victron does not give a fixed data usage figure — it depends on the number of devices, system behaviour and settings. The manual recommends watching the RX and TX counters in the router for a few days and choosing a plan with a limit or pay-as-you-go. In real-time mode, usage increases significantly, so with a small package it is worth turning it off.
Name discrepancy: the GX device manual expands VRM as “Victron Remote Monitoring”, while the GX LTE 4G modem manual expands it as “Victron Remote Management”. It is the same portal. VRM connection error codes (#150–#159) are described in GX error codes.
Devices in this guide
 Cerbo GXSystem control centre and gateway to the VRM portal.
 Ekrano GXGX centre with built-in 7″ touchscreen.
 GX Touch 50/70Optional 5- or 7-inch display for Cerbo GX: system overview, settings, surface or flush mounting.
 GX LTE 4G2G/3G/4G modem for GX devices — internet and the VRM portal where there is no Wi-Fi.
Sources
- VRM Portal manual — registration, dashboard and real-time, alarms and notifications, remote updates, multiple installations, sharing, VRM app, FAQvictronenergy.com · EN
- Cerbo GX manual, chapter 7 “Internet connectivity” — Ethernet, Wi‑Fi, GX LTE 4G, mobile router, connection priority, traffic limitingvictronenergy.com · EN
- Cerbo GX manual, chapter 13 “VRM Portal” — registration, data logging and buffering, access modes, errors #150–#159victronenergy.com · EN
- GX LTE 4G manual — models, bands, technical datavictronenergy.com · EN